Installation of Solar Panels Explained
Installing solar panels can be a complicated process, but many factors will influence how they are installed. For example, how much sun does your home get? What size do you want the solar panels to be? Where on the roof do you want them placed? Do you want to use an installer or go it alone? We will discuss all of these factors and how they affect how your solar panels will be installed.
There is no denying that installing solar panels has become more popular in recent years. With rising costs for electricity and natural gas combined with a rapidly increasing demand for renewable energy sources, people have been looking at alternative ways to power their homes. But what about those who don’t want to go all out and install a full photovoltaic system? What about those who can’t afford the up-front cost of installation, or how do they know how much power their home actually needs?
In this article, we will take a look at how solar panels are installed. We will discuss how solar panels work, what factors influence how they are installed, how much it will cost you to have them installed, and how long the process will take.
Here is a simplified process how to install solar panels:
- Set Up Scaffolding or Ladders
- Install the solar panel mounts/racking
- Fasten the solar panels to the racking
- Wire the solar panels
- Connect the wiring
- Install the charge controller
Set Up Scaffolding or ladders
The first thing that will happen when installing solar panels is setting up scaffolding. This process can be costly, but how much it costs depends on how tall the building is and how many stories to install them on. The cost for this process varies between $600-$2000 per day, depending on the location and height of the buildings.
Obviously, if you install solar panels at your home, you are probably just dealing with one story. The price of the scaffolding will be much less high for this process, but how much it costs will still vary depending on how many panels need to be installed and how high up they need to go.
Install Solar Panel Mounts/Racking
The next step is to install the mounts or racking system for the solar panels. This step will vary depending on how many you need and how high they will go, but it is usually between $500-$2000 per mount.
A racking system is basically how the solar panels are going to be positioned on your roof. There are different racking systems styles, but it may depend on what type of modules you use. Some types only work with certain mounts and vice versa, making sure this is considered before installation starts.
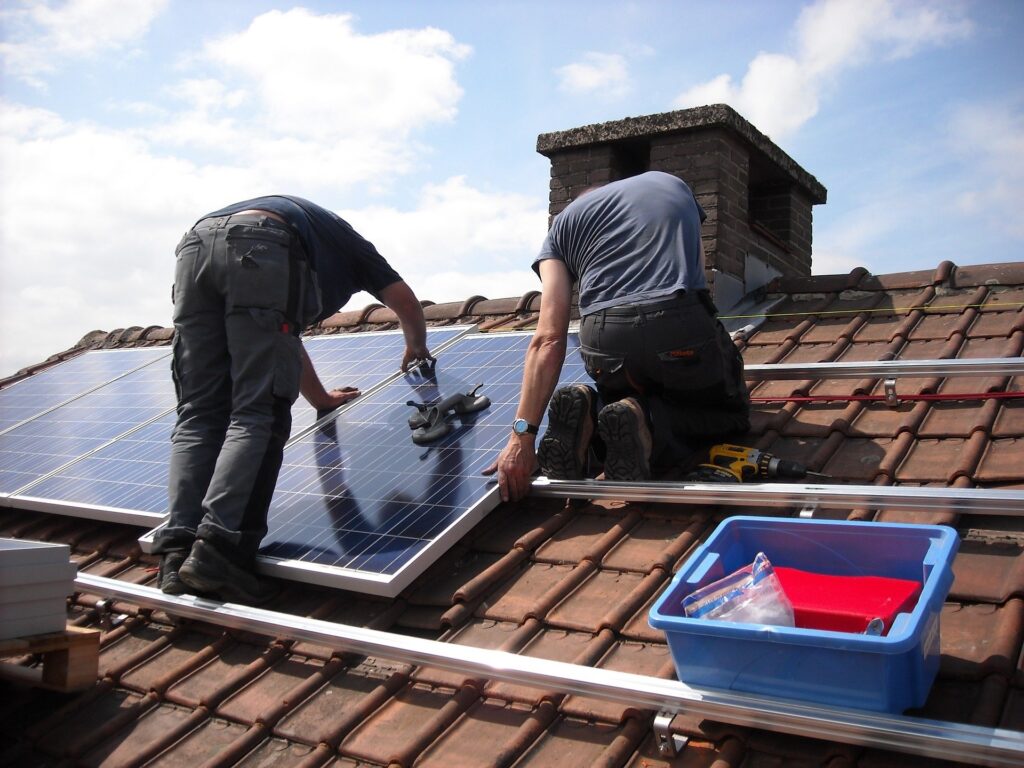
Fasten Solar Panels onto Racks/Mounts
Now that the mounts or racking is in place, it’s time to install the actual panels. The solar panels are fastened onto the mounts with screws, but how many solar panels you need will depend on how big your roof is. The more space, the better because it means a bigger surface area for generating power, which means that more electricity can be generated over time.
Luckily, most companies offer solar panel kits with all of the necessary tools to make installation easier. This kit usually includes ladders, screws, and other tools to make the process as easy as possible for you to reduce installation time, which means lower costs!
Wire the Solar Panels.
Now that the solar panels are installed, it’s time to wire them. The wiring process is a little more complicated because you have to know how to read a solar panel. This basically means that you have three different connections for the wires.
One goes from the positive output of your solar panel and then branches out across the panels on your roof to connect with all of them.
Another wire connects from your solar panel’s negative output and then branches out again to connect with all of the panels on your roof as well.
Finally, another wire will go from one connector on one end of the array and connect to the other connector on the other side of the array.
There are several different types of connectors that you can use for this process, but it is usually best to use the connectors included in your solar panel kit.
Connect The Wires
The next step after you wire everything together is to connect each of these wires on the backside of the panels. This can be done with an electrical box or junction box and then using a protective cover over all of the wires.
The type of connector you use will also be based on how many panels are being installed and how they are positioned. Still, it is usually best to consult an electrician for this step because there may need to be a transformer or other electrical equipment involved.
Install Solar Charge Controller
The last step in installing solar panels is to install the solar charge controller. This is how you will use all of your electricity from the solar panels to be stored and then used later on when needed.
The best way to do this is by using a bypass plug system that will automatically shut off if there’s an overload or shortage in power, so everything stays safe while still generating power.
Other factors that influence your solar panel installation
How much sun does your home get?
One of the factors that influence how solar panels are installed is how much sun your home gets. Solar panels typically need a minimum of five hours per day for their power-producing capabilities to be at their best. So if you live in an area with less sun, then solar panels may not be the best option for you.
States like California are perfect for solar panels because the sun is strong and constant. If you live in an area that only gets a few hours of sun per day, it may be best to invest in different renewable energy sources like wind or geothermal power.
How much power does your home need?
Another factor to consider is how much power your home needs. Solar panels can provide energy savings and help reduce costs associated with electricity bills, but they are only as efficient as how much power your household actually uses. So if you’re using a few lights, a computer, and maybe a TV, then you likely won’t get much energy savings from your panels.
But if you have an industrial-sized home that uses up a lot of energy, say for heating or air conditioning, then your solar panels can help cut down on how much power you use.
If your solar panels produce more energy than you need, then net-metering can also be an advantage.
Net metering is a technique that allows you to send any excess energy from your solar panels back to the grid for use by others. This can be achieved with the help of a bi-directional meter that allows you to track energy going both in and out. When the solar panels produce more power than your home uses, you can send that energy back to the grid and get utility company credits for how much surplus electricity has been generated.
You can also store excess energy like in a battery bank, but this will typically cost about $1000 per kilowatt-hour, which means it may be better if you’re using more electricity from your panels.
Type and Size of the solar panels
The size of the solar panels can also affect the installation process. Larger solar arrays will need more wiring, more space, and more support frames to get them up off the ground. The type of outside support you use will depend on how large your solar panel array is, but some techniques can work for all install types. One option you have is to find a place on your roof that has enough room for the panels while accounting for safety concerns like pipes and ventilation under the panels, so they don’t overheat.
Another option is to put the panels on a ground mount which can be done using posts or concrete. But how you place your solar panels may depend on how much space you have and what kind of conditions are available in that area, like if there’s any shade from nearby trees, for example.
Location of solar panels your roof
The first step in installing solar panels on your roof is to figure out the location that receives the most sun exposure. The location with five hours or more of sun exposure per day will receive the maximum amount of energy from the sun, and this will also maximize the output from your solar panels.
Normally your solar panels should be installed in a south-facing direction to maximize how much energy they can produce.
Another consideration is to minimize the shading on your solar panels because that will reduce how much power they produce. So if you have a tree or other obstruction in the way of where to install them, then it may be best to place the panel somewhere else on your roof that gets more sun exposure.
The orientation of your home can also affect how well-positioned they are for maximum sunlight exposure.
If you have a home that faces south, then the solar panels will be on your roof and facing south too. But if your house is set in an east-west direction, then your solar panels may be facing east or west and not south. In that case, you can choose how to orient them, so they’re receiving the most sun exposure.
Roof type and how much space you have
The way your roof is constructed will also affect how easy it is to install solar panels on it. If your roof has a steep slope, then the installation process may be more challenging because of how hard it can be for workers to get up there safely. It may not even work for some types of roofs, like a flat roof. And how much space you have on your roof will also affect how many solar panels you can install because the more space available for panels, the more rows and columns you can place up there.
The type of shingles or other materials used on your current roof may also affect if you can install solar panels. Some older roof materials may not be able to support the weight of solar panels, and so you’ll need a roof professional to evaluate how much weight they can handle.
How long will it take to install solar panels, and what does installation cost?
Since installing solar panels is a complicated process, it takes 3 to 4 days to install. It varies, however, with most installations being completed within about 5 days.
The size of solar panels will also affect how much they cost and how long it takes to install them – smaller, more simple systems that are less than 300-watt may only take a couple of days to install. Still, larger installations with many different types of rows can take longer.
Installation cost will also depend on the size of the system you are installing and which type of panels you choose. For example, a smaller system like 6 kW may cost around $5000, while a larger system will cost around $9000-10,000.
In conclusion, solar panels are an excellent way to reduce your monthly electricity costs while saving the environment at the same time. But many factors will influence how they’re installed, and you must know what is required of you before committing to them for your home.